How to Install
How to Install OGDASH or PowerTune Digital Software
Follow these simple steps to install OGDASH or PowerTune Digital Software on your Raspberry Pi:
Collapsible content
Step 1: Download the Software
- Head to our Downloads Page and download your desired version:
- Download Win32 Disk Imager: You will also need to download Win32 Disk Imager. It can be found here.
Step 2: Install Win32 Disk Imager
- Run the installer for Win32 Disk Imager that you downloaded.
- Follow the on-screen instructions to complete the installation.
Step 3: Prepare Your SD Card
- Insert Your SD Card: Insert an SD card with at least 32GB of storage into your computer's SD card reader. We recommend using high-quality SD cards for optimal performance.
Step 4: Write the Image to the SD Card
- Open Win32 Disk Imager.
- Click the folder icon to select the downloaded image file (OGDASH or PowerTune Digital).
- Select the drive letter that corresponds to your SD card.
- Click "Write" to begin writing the image to the SD card.
- Wait for the process to complete. This may take several minutes.
Step 5: Insert the SD Card into Your Raspberry Pi
- Once the writing process is complete, safely remove the SD card from your computer.
- Insert the SD card into your Raspberry Pi.
- Power on your Raspberry Pi.
Step 6: Activate Your Software
Activate Your Software
That's it, all done! Now you just need to activate the version of the software you installed. To activate the software and unlock the full features. Guide Below.
How to get a licence key
To purchase your license, we need two pieces of information from the Raspberry Pi running your software. Follow these simple steps:
Collapsible content

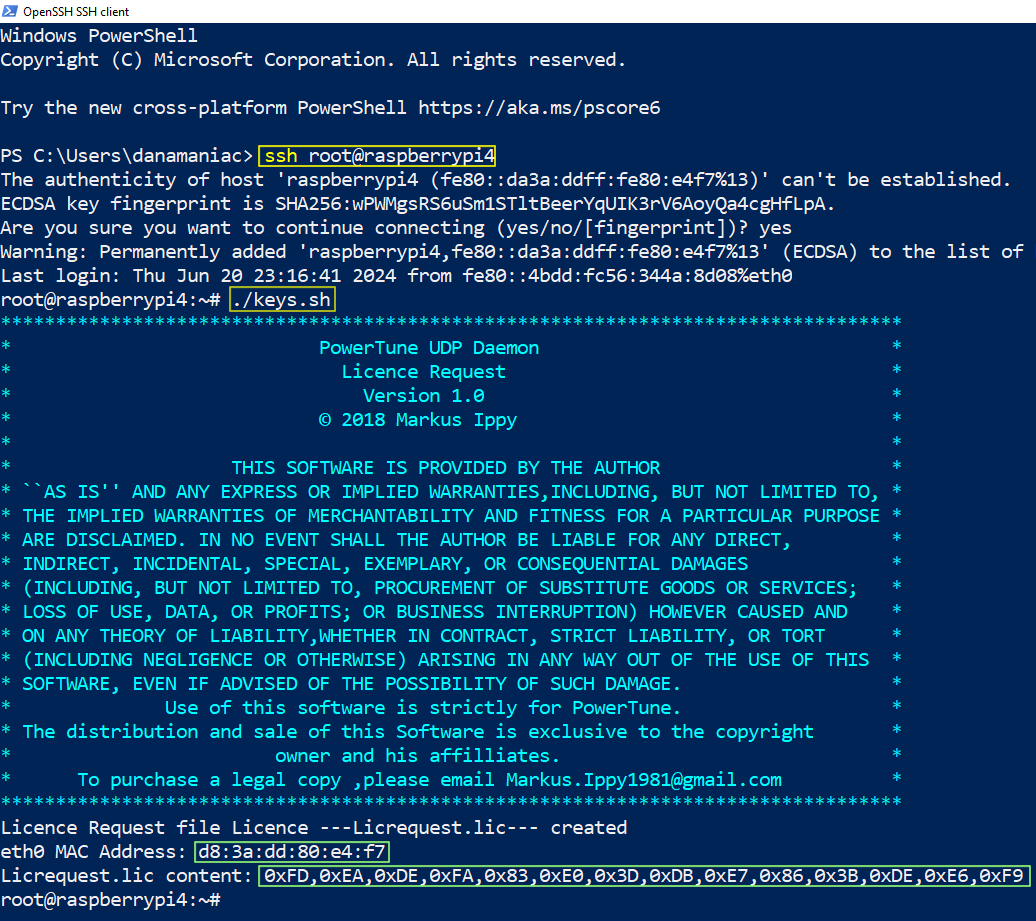
Step 1: Connect to Your Raspberry Pi
- Ensure your dash is powered on and connected to your Wi-Fi network.
- On your computer, open the Command Prompt (CMD). You can find it by searching for "cmd" in the Start menu.
- In the Command Prompt window, type ssh root@raspberrypi4 and press Enter. This command will initiate a secure connection between your computer and your Raspberry Pi.
- If prompted, enter the password for your Raspberry Pi to complete the connection.
Step 2: Retrieve the Required Information
- Once you are connected to your Raspberry Pi via SSH, type ./keys.sh and press Enter.
- The screen will display two pieces of information:
- Make sure to note down both the MAC address and the unique code, as these are necessary for generating your license key.
Step 3: Copy and Send the Information
- Carefully copy both the MAC address and the unique code displayed on the screen.
- Add these details when you purchase you License HERE.
If you encounter any issues or need further assistance, please don't hesitate to reach out. We're here to help!